“Changing of the Pit”

Thursday, May 21st, 2009

I am always looking for ways to improve the design of the bowling lane. One thing I haven’t been satisfied with is that the ball sometimes rebounds back onto the lane (or hits the back of the tail plank or back edge of the gutters) when it is rolled very hard. I have a lot of cushioning on the back wall of the pit, it is wrapped in black vinyl and looks good and feels good, but I’m finding it isn’t always practical with bowlers who roll the ball harder than normal. I don’t want to have to be that nervous bowling lane owner who has to tell people (like my own dad, who rolls it really fast) to slow down, etc.

One option is to deepen the pit (it currently extends 16 inches behind the lane) but that would involve removing the rear wall and back end of the sidewalls and i really don’t want to have to do that. Also, I am concerned with the pin boys and pin girls being able to comfortably reach up to the headpin spot on the pin table when setting pins if they are moved back further. And finally, I really don’t have any more room in my basement to extend it anyways so that’s not really an option.

Although I have 16 inches behind the tail plank, the padding (pit cushion) on the back wall was around 4 inches thick when I surrounded it with vinyl so it was really more like 12 inches or less.

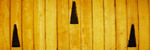
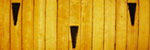
So, last night I removed the vinyl and padding from the back wall of the pit and I am playing around with a hanging pin curtain. It is basically a stiffer floor mat with black carpet on one side and a rubber backing on the other. I am thinking this will absorb the impact of the ball and pins without rebounding the ball back onto the lane when it is thrown hard. I am working on this now and will update it when I finalize it. Initial results show that it works great when the ball is rolled so it stays on the lane and hits the curtain, but when the ball goes into the gutters and exits into the back corners the curtain isn’t “catching” it and it loudly hits the corner of the back wall. I have an idea and made another trip to Home Depot today so we’ll see how that goes.

I have such a love for bowling, the nostalgia that surrounds it, and the way the equipment and pinsetters work, but I have absolutely no experience working in a real center or on real machines. I am trying to learn all I can online and I am spending more time at www.bowltech.com trying learn all I can and soak up info like a sponge from all of the knowledge and know-how that goes on there. I still have a dream of coming up with a fully automatic half-scale pinsetter to go along with my lane.

I am also still working on my AMF Magic Triangle style (with Pindicators) masking unit and am excited about it and will also share pics of that project soon.

That’s all for now bowling fans. Thanks again for reading and if any one has any ideas on improving the lane or other good resources for me to expand my knowledge of pinsetter design and operation please share it with me.

-Chad

Pinsetter finished and We’re on YouTube!

Monday, May 11th, 2009

Hello fellow bowling buffs. I’m happy to report that I have found some time of late to continue the dream and I have finished what I like to call the “semi-automatic/mostly manual” pinsetter. 🙂

Here’s a description of it: My pinsetter is suspended above the pindeck and raises and lowers via plastic coated wire cable suspended on an overhead pulley down to a consistent position where the pins can then be placed in the holes that are just wide enough to accommodate the pins. This forces them exactly where they belong and doesn’t allow room to be placed off-spot. Once the pins are set in the holes a handle is pulled down which raises the pin table and the pins are ready for the next shot. The handle locks in place so that the table cannot inadvertently drop due to impact or any other effect. I also added an aluminum deck shield for authenticity.

A great feature is the pin table is very sturdy but light enough that my 8 year old daughter had absolutely no problems lowering, raising and locking it into place.

Yes, you still need someone in the pit area setting pins and returning balls but this definitely makes the job easier, cuts down on the time it takes to set the pins, and forces the pins to be set accurately. And it’s fun! I will put up some pics of the finished (for now) 🙂 pinsetter soon.

Also, I took some video tonight and have edited and uploaded the first one to YouTube. It is a video of me rolling a nice strike (you can see how you can realistically hook the ball) and my daughter lowering the pinsetter, returning the ball down the ball return, setting the pins and raising and locking the pinsetter. All of this is seen from the bowlers perspective. I put up a crude, temporary masking unit. But I have to tell you that not seeing the person back there setting the pins (other than the occasional arm/hand retrieving some dead wood) seeing the aluminum deck shield lower and then you see all of the pins there as it raises makes it so authentic! The sound on my camera was all messed up so I dropped the audio and spliced in a “regulation” roll and strike sound. It works really well. Here’s our YouTube debut and thanks for reading.

Long time no update…

Tuesday, April 7th, 2009

Hello all,

First, I would like to apologize for not putting a new post up here for such a long while.

We are continuing to bowl on and enjoy our basement bowling lane. It still looks brand new (the laminate lane surface has held up beautifully) and has given us many many hours of enjoyment.

I have to tell you that this has exceeded everything that I imagined when I thought of doing this site. I have heard from dozens and dozens of people who either shared a similar dream or have done a similar project or are planning on doing one. I have tried to respond to all of the e-mails but I know there are still several of you that haven’t heard back from me. I am going to try and respond to all of you here as soon as I can. I want to thank everyone for all of the many messages I have received that have been filled with compliments and questions and stories very much like mine. We have had over 10,000 visitors to the site now.

I know I’ve said this before but I am planning on putting up some new pics and some videos as soon as I get the time.

Thanks again for all of your comments, compliments and stories. See you soon.

Update, sort of. :-)

Friday, November 21st, 2008

Hello all!

Just a quick note to say that I’m still here. I hope to find the time to finish up the pinsetter and masking unit soon. I worked on and constructed a pinsetter design but it didn’t function like I wanted it to so I had to tear it down and rethink it a bit, (Hey, stuff like this happens when you are doing a project like this) then life and work got super busy and now my weekends are currently filled with my supporting my daughters sporting activities (bowling and basketball), but I am still working on pinsetter ideas.

We are continuing to bowl on our lane and we all love it! It’s holding up perfectly. I think everyone should have one of these in their home. Tonight my youngest daughter (8 years old) bowled 4 games and she had her highest score ever in her last game.

I hope to take some video and post it up here soon. Thank you for continuing to visit the site and please continue to share your stories with me. Many of you have written me, some of you telling me about your own lane projects. I am truly enjoying this.

Everyone have a safe and joyous Thanksgiving and I’ll check in with you soon.

It’s amazing how happy some dots and arrows can make a grown man feel…

Sunday, October 5th, 2008

Hey everyone! I’m still here! 🙂
Life is great, just really busy of late. I have however found some time this past week to work on the lane and I wanted to share it with you all.

I finally finished putting all of the laminate lane surface on the lane. I am very happy with it. It performs perfectly. I can roll the ball with some hook on it and it will roll and then react. The lane is perfectly level. I can slowly roll the ball down the lane and it stays perfectly in the direction I rolled it.

I did all of the calculations and determined where the lane markings should go and what size they should be, based on half-scale of course. I have 7 dots on the approach / foul line area and I did a set of arrows down the first part of the approach. Standard arrows are at 12-16 feet past the foul line so mine are around 6 or 7 feet down. Standard arrows are 1 1/4″ x 6″ so mine are 5/8″ x 3″. I used a circle template for the foul line circles and I made a template for the arrows and measured them out and drew them with a black sharpie. It was nerve-racking knowing that any mistake would be permanent but everything turned out great and I am very happy with them.

I added a protective strip at the foul line to protect both the edge of the lane and the bowlers’ fingers.

I added a nice tailplank in the pit area at the rear of the pindeck. I slightly rounded the top of it so the any pins that fly around and hit it won’t get damaged.

I am also working on the pinsetter and will have more info on that later. There’s still lots to be done there but things are moving along, and the bowling is tons of fun! I am also going to be taking some video and posting it here in the coming weeks.

Thanks for reading and please feel free to leave comments or questions and I will do my best to answer them for you.

On the Level….

Thursday, September 11th, 2008

It’s been tough to find time to work on the lane of late but I haven’t been completely useless. I did find the time to get the bowling lane completely leveled. Man that lane is heavy! 🙂 I had to be smart and use a prybar and a small piece of 2×4 to lift the lane up enough to shim it where I needed to. It wasn’t off very much but it has to be as close to perfect as I can get it in order to give the most fair and realistic bowling experience. I checked the lane every foot along the way and it is now perfectly level.

I have also finished and attached the cushion in the back of the pit. I am very happy with it.

My wife bought me 5 yards of black vinyl for my birthday (Thanks Honey!), WAY more than I needed, but that’s fine, especially since I have zero experience in working with vinyl.

Basically I measured how much of the area needed to be covered with vinyl. Allowed a couple of inches of extra material on each side and cut it. I attached the bottom first (from the inside) then inserted my “padding” (a couple of 16″ pillows that together span the 32″ pit), pulled the vinyl tightly over it, pulled it over the top/back of the pit, folded it under itself and then put some heavy staples in it. Not sure if it was the best way or not but it works for me and I think it looks great.

Since I now have the lane leveled the next step will be to attach the 1/2″ MDF underlayment for the lane surface. I’ll let you know when I get that finished and probably take some more pics.

I also need to add some polyurethane on the gutters. I used 3 coats of oil-based paint and they look great but I want to give them a little extra protection.

Thanks for stopping by and I’ll keep you posted.

Bowling lane bowls over party-goers…..

Monday, August 25th, 2008

My wife and I had a birthday party for my oldest daughter this past Saturday night. We had 18 people here, most of whom had not seen the new bowling area of our basement. Some had no idea that I had been working on it. I mounted the new masking units on the wall just before people started arriving. Everyone was drawn to bowling area and asking lots of questions, and all of them wanted to try it out.

So…. I took some other laminate that I had (the same that I used for the approach area) and quickly made a lane surface. I was a little nervous because no balls had really been rolled down the length of the lane (other than rolling a ball down the gutter and sending it back down the ball return). Also, the pit area isn’t finished yet, still have a little painting and polyurethaning (is that a word?) to do, and I have not attached the cushion at the back of the pindeck yet. But people were eagerly lining up and I heard the kids calling out “I’m first, I’m second”, etc. so I made a makeshift cushion with some padding and the vinyl that will be used for the official cushion and let them have at it.

I can’t really explain the feeling of watching people get so much enjoyment from using something that I created over the past couple of months. I poured my heart and soul into it and it was a big moment. What if they didn’t like it? What if it just didn’t feel right? What if it wasn’t realistic? Would the laminate truly work as a lane surface? What if it broke when people actually used it? LOL!

I think my smile was just as big as everyone who took turns rolling the ball down the lane and knocking down pins. My youngest daughter went |9|-|, |X|X|, |X|X| in her first 3 frames! Much better than I did! The pin action was very realistic. The laminate seemed to be a perfect surface. The ball actually had some revs and hooked or backed up, depending on who rolled it.

My Dad and I had just as much fun setting pins and sending the balls back down the return as everyone else did bowling. I couldn’t have been more proud. I can honestly say that everyone who tried it really enjoyed it.

After about 45 minutes I cut everyone off and we headed upstairs to watch my daughter open her presents, eat some cake, and play some board games. All in all it was a great night, and a huge test was passed. My only regret is that I was so into what was going on that I didn’t take 1 single pic of all of us bowling.

The actual maple lane surface that I will install onto the lane came this morning, can’t wait to get it installed. The “full-sized” bowling league starts tomorrow night at the local lanes. Life is good!

Masking Units

Wednesday, August 20th, 2008

I came across some masking units for sale online. I inquired about them and Dad and I took his truck and picked them up this past Saturday.

I really like them. They look to be from the late 70’s early 80’s. One side has an animation of a bowler going through his approach. The other side has graphics of balls and pins. They have a vector/skeletal style and a very colorful look to them. I think they’ll look great up on the wall next to the lane. They are nearly 23 feet long together.

August 12, 2008

Tuesday, August 12th, 2008

Decided that I didn’t like the blue gutters with the (mostly) black sides. So… changed the color of the gutters to red. Much better. Bought some candlepin bowling balls on eBay and received them today, I think they are going to work great. An exact half-scale ball is 4.3 inches and these are 4.5 inches. The candlepin balls are a little heavier (2 lbs. 4 oz) than the Linds half-scale ball (1 lb 8 oz). I think they are going to drive through the pins better and deflect less. Made a quick little video of the ball return. I can put it up on here if anyone is interested.

Lane

Wednesday, August 6th, 2008

Before I even started building the lane I had design after design in my head and on paper. I have settled on the lane foundation but I am still changing my mind on details. Just when I think I have something finalized I tear it apart and decide on another, better (I hope) way to do it. I am wearing out a path to the home improvement store! 🙂

I knew I wanted something strong, that would always be solid and level. So I am using 2x10s cross-braces for the bedding, with another 2×4 bed longways on top of those. This is the way many regulation lanes are built, also it elevates the lane to a comfortable level for adults and kids, about 13 3/4 inches off the floor.

I have just a 4 foot approach, enough room for an adult to take a good-sized step and roll the ball. I only have a 28 foot long area where I am building my lane so I wanted to maximize the space for the lane.

Here is a construction shot of the approach. It is not a final construction pic, just wanted to give an idea of what I’m talking about. (Notice that when building a lane you can never have too many levels.)

Below is another shot, standing where the approach will be, looking down the uncompleted lane. Nothing is attached yet.

Below the bottom lane bedding is complete. On top of it I laid a couple of 2x4s, a sheet of MDF and a piece of wood painted the colors my gutters will be.

After the flood came I had to take some time to rip up all of the carpet and repair the damage, then it was back to work on the dream. Below I finished painting the gutters, the color is “sail blue”. The sides will be black (half of the left side is finished and the right side has primer applied) and I am hoping to paint some retro-ish things on the side. I laid the MDF on top of the bedding, soon I will attach it and then put the laminate on top, which will be the lane surface.

Bye Bye Blue! Just didn’t like the way the black sides and the blue gutters didn’t seem to go together so I changed it to “Sunrise Red”. Also, kind of hard to see but i have finished alot of the pit work. I decided to lay the top 2×4 bedding flat because it was too far of a drop to the gutter when they stood on end, makes it more realistic and it won’t sacrifice any strength.

Below is the approach end of the ball return I built. I took a video of it in action tonight, I’ll see if I can post it up here some time soon. The ball return works perfectly. The ball on the left is the exact half-scale ball (4.3 inches) from Linds. The 5 on the right are the candlepin balls (4.5 inches) that I just received today from Ebay.